Sunday, February 10, 2013
Session Time Out in SharePoint 2010
We got session time out problem for our sharepoint 2010 application,after googling i was able to increase session time by following the below navigation path
Central Administration -> Application Management -> Manage Web Applications -> Select your Web Application->Click on General Settings Now in Web Page Security Validation category you can set the time as in the below screen shot.
Issues after deploying SharePoint 2010 Designer Reusable Workflow
I got the below issue from one of our colleague in our practise.
Issue
We need to deploy SharePoint designer reusable workflow for approval process to other site collections. We try to get the WSP file from SharePoint Designer using ‘Save as Template’. We try to Import Reusable workflow to Visual Studio using WSP generated above. We try deploy it to other sites and then we are facing the following issues.
1. When we try to Add a workflow to a list, the deployed workflow is listed in All content types. And when we try to select the custom content type we generated, the workflow is not displayed.
2. After adding that workflow to that list, when we initiate that workflow to a list item, it is creating a task. But when we try to edit that task form it is giving page not found error.
Considering this scenario, it would help us if anyone can provide us the deployment approach for a re-usable SharePoint Designer 2010 workflow as a WSP solution package.
After understanding the above,one of my teammate gave the solution as below i.e creating the feature and attaching to workflow association.
Reply
public override void FeatureActivated(SPFeatureReceiverProperties properties)
{
SPWorkflowTemplate workflowTemplate = null; // Workflow template
SPWorkflowAssociation workflowAssociation = null; //Workflow association
SPList historyList = null; // Workflow history list
SPList taskList = null; // Workflow tasks list
SPList list = null;
//Sharepoint List
using (SPSite site = (SPSite)properties.Feature.Parent)
{
using (SPWeb web = site.OpenWeb())
{
web.AllowUnsafeUpdates = true;
workflowTemplate = web.WorkflowTemplates.GetTemplateByName(SPPROCWorkflowAssociationConstants.WorkFlowName, System.Globalization.CultureInfo.CurrentCulture);
list = web.Lists[SPPROCWorkflowAssociationConstants.TargetLibrary];
historyList = web.Lists[SPPROCWorkflowAssociationConstants.HistoryList];
taskList = web.Lists[SPPROCWorkflowAssociationConstants.TaskList];
SPContentType ctType = list.ContentTypes[SPPROCWorkflowAssociationConstants.ContentType];
try
{
// Create workflow association
workflowAssociation = SPWorkflowAssociation.CreateListContentTypeAssociation(workflowTemplate, SPPROCWorkflowAssociationConstants.WorkFlowName, taskList, historyList);
// Set workflow parameters
workflowAssociation.AllowManual = true;
workflowAssociation.AutoStartCreate = false;
workflowAssociation.AutoStartChange = false;
// Add workflow association to my list
ctType.WorkflowAssociations.Add(workflowAssociation);
// Enable workflow
workflowAssociation.Enabled = true;
}
catch(Exception exception)
{
SharePointLogger.Local.TraceToDeveloper(exception, exception.Message);
}
finally
{
web.AllowUnsafeUpdates = false;
}
}
}
}
Copy Data from One site to Another Site
Some times we may need to copy the pages from one site to another under the site collection.In SP 2010 its pretty simple,let me explain with clearly.For example there is site 'Latest News',you want to copy the pages from this site to other site called 'Latest News1'.For this navigation is as below
Click on 'Manage Content and structure' which is under 'Site Actions' as below
Through tree view on left side go to the site pages from where you want to copy.Select the pages,under Actions click 'Copy' as below
You will get the dialog box to select the destination as below
After copying it shows the copied page in the destination page as below
Select the destination and click OK.You will get the message as below
Reusable workflows in SharePoint 2010
A long awaited feature has finally come to the SharePoint 2010 and the feature is reusable workflows. In earlier versions we could not create reusable workflows.
We now can create reusable workflow for a content type. Yes, there is one limitation which is we can create a reusable workflows only for content types. So when we add content type to list or library we get the workflow along with it which has logic attached to it.
We will see that in action. First we will create a content type, add that content type to list, then we will create a very simple workflow of course a reusable one which is attached to the content type that we will create and then we will see how that works with workflow in a library.
So go ahead and open SharePoint designer 2010. I am first going to create a site column and content types can only contain site columns.
Click on New site column, I am selecting Choice column and giving name and assigning to a new group and add some data to it.
So now we have site column in our site and we will now create content type.
Now create a new content type.
Now you can find it to the custom group that we gave
Now click on content type and go to its settings page
Click on edit content type columns and then click on add existing site columns from top left
And then select our site column to include the column in the content type.
Keeping the content type settings page open, click on administration web page from where we will associate document template with this content type.
Click on advanced settings, upload a document template. So now we have associated a document template with this content type.
Now is the time when we will add this content type to the existing document library.
Go back to designer, in all lists and library open the library on which you want this content type to be added.
Once the library opens, click on content type settings and add the department category content type to it.
Now we have that document template available in the library. To see that you can open this in browser and then see the library all items page and click on New.
Now open the SharePoint Designer, connect with your site and click on Reusable Workflow.
Select document content type, here we can select the content type on which we would like to attach the workflow to.
Now check the condition, that if the current field is equals to department category and compare that with Marketing then log to history that marketing was selected.
And I have then put if else condition for each department.
Save the workflow and then publish the workflow.
Now it’s time to associate this workflow with the content type. Being on the same workflow settings page, click on associate to content type option from ribbon.
When you click on it, the browser window opens which allows you to associate. Select start this workflow on item adding.
Once you create a document using the template, and when you save it, you can see the workflow has triggered and then completed by saving the right information in the workflow history list.
Hiding Ribbon from SharePoint Page
Wonder how to hide ribbon from any SharePoint page if you wish to. If you have an access on the page and if you have placed a web part on it, then this is the way to hide ribbon.
It’s one simple line of code that does the magic. I am writing it in button click just to demonstrate you.
And you write a code on button.
SPRibbon.GetCurrent(this.Page).CommandUIVisible = false;
Click the button. And you are done.
Connectable web parts in MOSS / SharePoint 2010
I covered a basic topic that is how to connect two different custom web parts with custom properties.
So here explaining you how to connect two web parts.
In web part connection we have two types of web part. One is the provider web part and the other is consumer web part.
Provider web part sends a property which is received by the consumer web part and then processed in a code.
Create new empty project give it a name connectabewebpart.
Add as a farm solution and then click on add item. Point to an Interface.
We need to add interface as this interface will be implemented by provider web part. We have to define all the properties in this interface which we want provider web part to be able to send to consumer web part.
I am going to have one single property called OrderNumber just for demonstration purpose.
Define an interface like this. We are declaring one property called OrderNumber.
Now we are going to add new item to the project and select type web part and call it OrderNumberProviderWebPart.
Now this web part class must implement interface that we defined. So let’s implement this interface in provider class.
Now because we implemented interface, we need to define property which is declared in the interface.
So we have defined local variable and public property with the same name. Plus we have decorated that property with several attribute so that we can set the property with editor pane when we edit the web part. The property is set to have shared behavior.
Then we have defined one very important method which returns the interface and able to pass on this property which we defined as connection provider attribute of the method.
So here is a complete code for connection provider web part.
Now we are going to add consumer web part. So add new item, add web part. Call it OrderNumberConsumerWebPart. Now this web part will not implement interface. We need to declare a local variable which will receive the order number from provider.
So we’ve added a local variable called providedordernumber.
We need to define a method which has connectionconsumer attribute with property name that is defined in an interface. Parameter will be an interface which has that property that can be set to a local variable.
And then in create child control method we are showing the provided order number. Here is a code.
We are done with creating both web parts. It’s time to deploy them and check how they work.
I have deployed both web parts and I am on a page where I want to add them. Click to add web part.
Go to custom tab and you’ll find both web parts there. Add them wherever you want on a page.
Now we have something like this.
Edit the provider web part and set order number in editor part.
Now we need to send this order number to consumer web part. Either you can send from provider to consumer or you can receive from provider in consumer. Both way works.
Once you set that you are done with connecting two web parts.
Create custom workflow action for SharePoint Designer 2010
Sometimes we may require creating a custom workflow action when default activity choices offered by designer do not suffice our need.
In this post, I am going to show you how to create a custom action for designer.
You would need Visual Studio for this. So open up VS studio and select Visual C# , empty project in SharePoint 2010.
Give it a name you want.
Deploy it as a farm solution.
Now go ahead and add one more project. This time select workflow – workflow activity library.
Now add two DLL references. Microsoft.SharePoint.dll and Microsoft.SharePoint.WorkflowActions.dll
Now we are going to create three properties which will act as parameters in our custom activity. One will be the site URL, other will be Web Name and the last will be the name of the contact list.
These properties are decorated with certain attributes and declared as dependency
properties. So go ahead and add three dependency properties.
public static DependencyProperty SiteUrlProperty =DependencyProperty.Register("SiteUrl",
typeof(string), typeof(CreateContactListType), new PropertyMetadata(""));
[DescriptionAttribute("Url of site where contact list will be created")]
[BrowsableAttribute(true)]
[DesignerSerializationVisibilityAttribute(DesignerSerializationVisibility.Visible)]
[ValidationOption(ValidationOption.Optional)]
public string SiteUrl
{
get
{
return ((string)(base.GetValue(CreateContactListType.SiteUrlProperty)));
}
set
{
base.SetValue(CreateContactListType.SiteUrlProperty, value);
}
}
public static DependencyProperty WebNameProperty =DependencyProperty.Register("WebName",
typeof(string), typeof(CreateContactListType), new PropertyMetadata(""));
[DescriptionAttribute("Name for Web")]
[BrowsableAttribute(true)]
[DesignerSerializationVisibilityAttribute(DesignerSerializationVisibility.Visible)]
[ValidationOption(ValidationOption.Optional)]
public string WebName
{
get
{
return ((string)(base.GetValue(CreateContactListType.WebNameProperty)));
}
set
{
base.SetValue(CreateContactListType.WebNameProperty, value);
}
}
public static DependencyProperty ContactListNameProperty =DependencyProperty.Register("ContactListName",
typeof(string), typeof(CreateContactListType), new PropertyMetadata(""));
[DescriptionAttribute("Name for contact list")]
[BrowsableAttribute(true)]
[DesignerSerializationVisibilityAttribute(DesignerSerializationVisibility.Visible)]
[ValidationOption(ValidationOption.Optional)]
public string ContactListName
{
get
{
return ((string)(base.GetValue(CreateContactListType.ContactListNameProperty)));
}
set
{
base.SetValue(CreateContactListType.ContactListNameProperty, value);
}
}
Now we need to write logic in Execute method as to what needs to be done when this activity executes.
So we are going to create a contact list in specified web with specified name. Remember return closed as that means activity has successfully completed as a status.
protected override ActivityExecutionStatus Execute(ActivityExecutionContextexecutionContext)
{
CreateContactList();
return ActivityExecutionStatus.Closed;
}
private void CreateContactList()
{
using (SPSite oSPSite = new SPSite(SiteUrl))
{
using (SPWeb oSPWeb = oSPSite.AllWebs[WebName])
{
Guid ContactListID = oSPWeb.Lists.Add(ContactListName, ContactListName + " Created From Designer",
SPListTemplateType.Contacts);
SPList contactList = oSPWeb.Lists[ContactListID];
contactList.OnQuickLaunch = true;
contactList.Update();
}
}
}
We are done with writing our code. It’s time to register the project with strong name. Go ahead in property of this project and give it a strong name.
Now right click the CustomDesignerWorkflowActivity project and add SharePoint mapped folder.
Select Template-1033-Workflow
Now we need to add .actions file which is very important from Designer stand point.
Add new item in the workflow folder and give a name as DesignerCustomActualActivity.actions
This is the file which actually tells SharePoint to make this action available in Designer.
Now add this XML in that file.
<?xml version="1.0" encoding="utf-8" ?>
<WorkflowInfo>
<Actions Sequential="then" Parallel="and">
<Action Name="Create Contact List"
ClassName="DesignerCustomActualActivity.CreateContactListType"
Assembly="DesignerCustomActualActivity, Version=1.0.0.0,
Culture=neutral, PublicKeyToken=5e36fcb66a91895d"
AppliesTo="all"
Category="SPKings Activity">
<RuleDesigner Sentence="Contact List Name %1 in %2 within site %3.">
<FieldBind Field="ContactListName" Text="Contact List Name"
DesignerType="TextArea" Id="1"/>
<FieldBind Field="WebName" Text="Web Name"
DesignerType="TextArea" Id="2"/>
<FieldBind Field="SiteUrl" Text="Url of base site" Id="3"
DesignerType="TextArea"/>
</RuleDesigner>
<Parameters>
<Parameter Name="ContactListName" Type="System.String, mscorlib"
Direction="In" />
<Parameter Name="WebName" Type="System.String, mscorlib"
Direction="In" />
<Parameter Name="SiteUrl" Type="System.String, mscorlib"
Direction="In" />
</Parameters>
</Action>
</Actions>
</WorkflowInfo>
If you observe closely, we have defined action in tag and inside it we registered our assembly and defined our own category. We can have the same name in category whenever we create our custom actions so that all our custom action comes under that category.
Then we set the rule designer and in that we have bounded our all three properties with their data type. Then we set the same three as parameters as input because we will be setting the properties.
Now we need to add these into the package. So double click on the package in the project and then click on advanced.
Now add assemblies. You can get this info from GAC If you deploy this application’s DLL in GAC, from there you can get public key token information and then register it here.
If you get an access denied while dragging DLL to assembly or not able to install even through gacutil, then deploy the solution, you will get that in assembly and from there you can get it.
Just a handy tip, there is one more way to get public key token if you do not want to deploy the DLL in GAC and then get the token. Read this post.
Now one more change left and that needs to be done in web.config file of web application. Open up the web.config file of your web application from wss\virtual directory folder and find a tag Authorized Type and add our custom assembly information as mentioned below.
Now build the application and then deploy the application. It’s time to test our custom action in action and to see if it has appeared in designer.
Open designer, connect with the site. Create workflow and click on actions. Here we are with our own custom action.
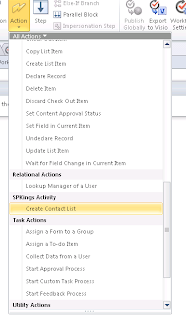
Click on the create contact list action and we get this. These come from the action file that we created.
Set up the parameters. Save and publish the workflow.
And set up a workflow to run on item adding. Add the item and see the list gets created in the web name you have mentioned in the designer. Execute method gets called when this action gets executed.
Subscribe to:
Posts (Atom)